Introduction
Welcome to this hands-on lab exploring a powerful and scalable web application architecture on Azure!
In this lab, you’ll learn how to integrate Azure Front Door, API Management (APIM), and App Service to create a robust and globally distributed solution.
Azure Front Door acts as a global load balancer, providing high availability and performance.
APIM centralizes API management, security, and observability.
App Service hosts your web application, providing a fully managed platform.
This lab will guide you through configuring each service and connecting them to create a secure, scalable, and manageable application. You’ll learn how to leverage Front Door for dynamic request acceleration, APIM for API security and traffic management, and App Service for easy deployment and scaling of your web app.
By the end of this lab, you’ll have a solid understanding of how these services work together to build modern cloud applications.
Lab Architecture Diagram

Lab Steps
Login to Azure
- Login to Azure.
- Check if you’re using the correct Subscription.

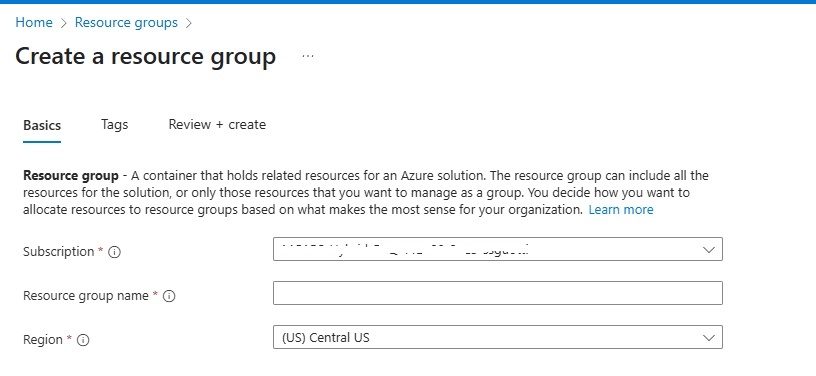
Create a Resource Group for your Lab
Create a Resource Group and provide name, select the Region and your Subscription to provision it.
For this Lab we’ll use project-integration-001.
A resource group in Azure is a logical container that holds related resources for an Azure solution.
These resources include virtual machines, databases, and virtual networks, among others.
Resource groups help manage and organize resources based on their lifecycle and security.
Once Finished to review all the tabs, Click Review + create.
Start Create your Resources (Azure Front Door - APIM - App Service)
Before to deploy the entire architecture (as described in our Lab Architecture Diagram),our primary focus will be on deploying the following components:
Overview
| Service | Description | Official Documentation | Video Resources | Additional Info |
|---|---|---|---|---|
| Azure Front Door | This will serve as the entry point for our application. Azure Front Door is a scalable and secure entry point for fast delivery of your global, mission-critical applications. It provides global load balancing, SSL offloading, and application acceleration to ensure high availability and performance. | Azure Front Door | Azure Front Door | If you are planning to use Client Certificates in Azure Front Door, at the moment Azure Front Door will not passthrough the client certificate to a backend (in this case APIM). It happens because it terminates the TLS at the edge. Due to this, we can’t route requests carrying client certificates to APIM via Azure Front Door as of now. Evaluate alternative services like Application Gateway that can support mutual authentication (mTLS). |
| API Management (APIM) | Azure Front Door will route traffic to the APIM, which acts as a gateway to manage, secure, and monitor APIs. | API Management | APIM Deep Dive | |
| App Service | The APIM will then route traffic to the App Service, where a REST API is hosted. The App Service provides a fully managed platform for building, deploying, and scaling web applications. | App Service | App Service |
Deploy App Service
Best Practices App Service
This document summarizes best practices for using App Service.
More detailed information can be found at the following link:
App Service Secure Baseline (Multi-tenant and ASE)
REST API Code
We’re going to deploy our App Service that will host our test REST API.
For your REST API we’re going to use this sample code:
const express = require('express');
const app = express();
const port = process.env.PORT || 3000;

// Example endpoint
app.get('/api/users/:id', (req, res) => {
  const userId = req.params.id;
  res.json({
    id: userId,
    name: 'Mario Rossi',
    email: 'mario.rossi@contoso.com'
  });
});

// Start the server
app.listen(port, () => {
  console.log(`Simulated API listening on the port ${port}`);
});
Source code: my-app-node
Now let’s start to deploy our App service and below I’ll provide step-by-step to deploy it integrating the sample code mentioned above.
Steps
Provision App Service
- Go to the Azure Portal –> find out App Service.

-
Click on Create button and let’s start the creation process.
-
Select Web App on the menu that will appear.
-
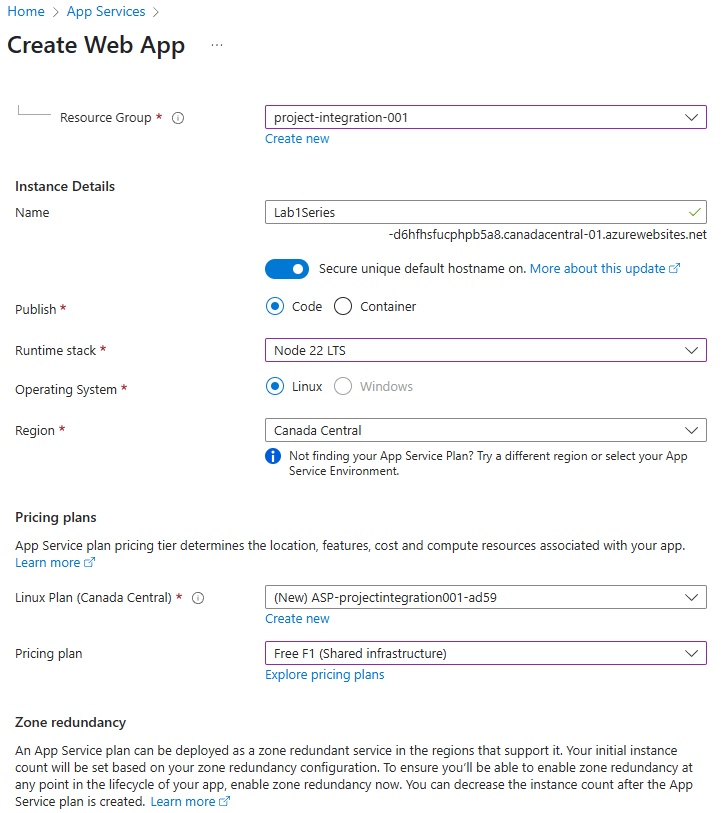
Select Resource Group (project-integration-001) , provide a name for your Web App.
-
In the Runtime Stack –> Select Node 22 TLS. OS leaves selected Linux.
-
Select the Region.
-
In the Pricing Plans –> select Free F1 for this Lab.
-
Zone Redundancy leaves disabled for this Lab.
-
Leave the Default options, only in the Networking part check if Enable public access is On.
Then click Review + create. Wait until the deployment will be completed.
Once the deployment is completed, you will land in the main page of your WebApp.
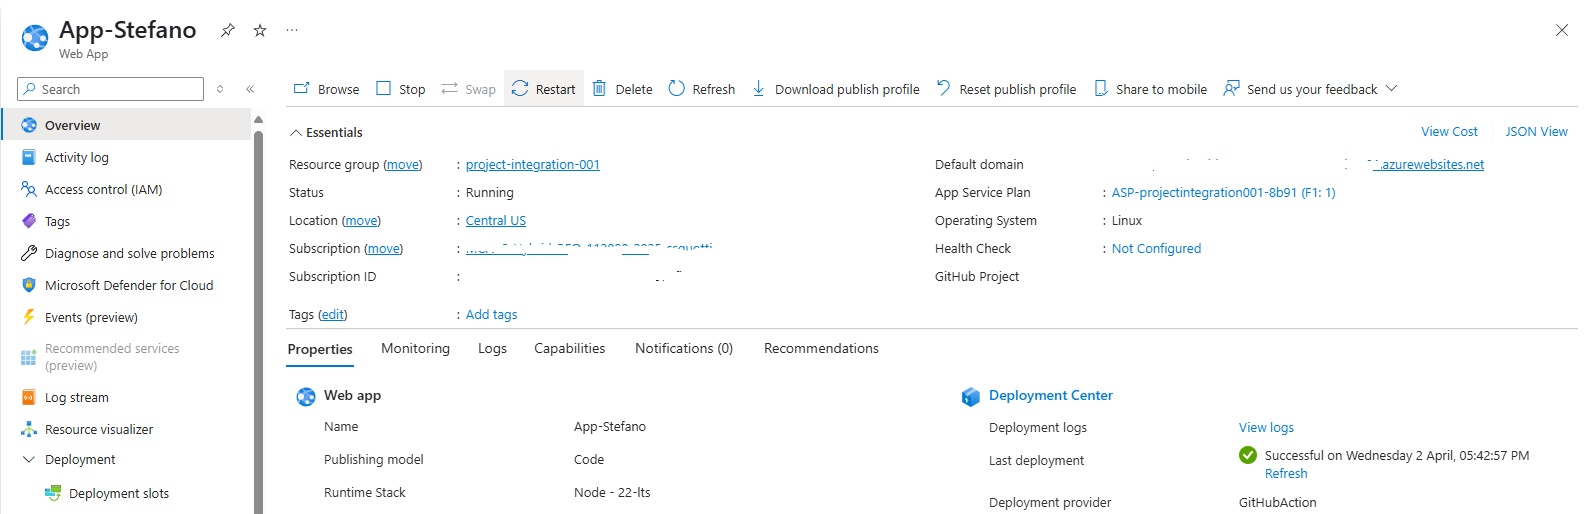
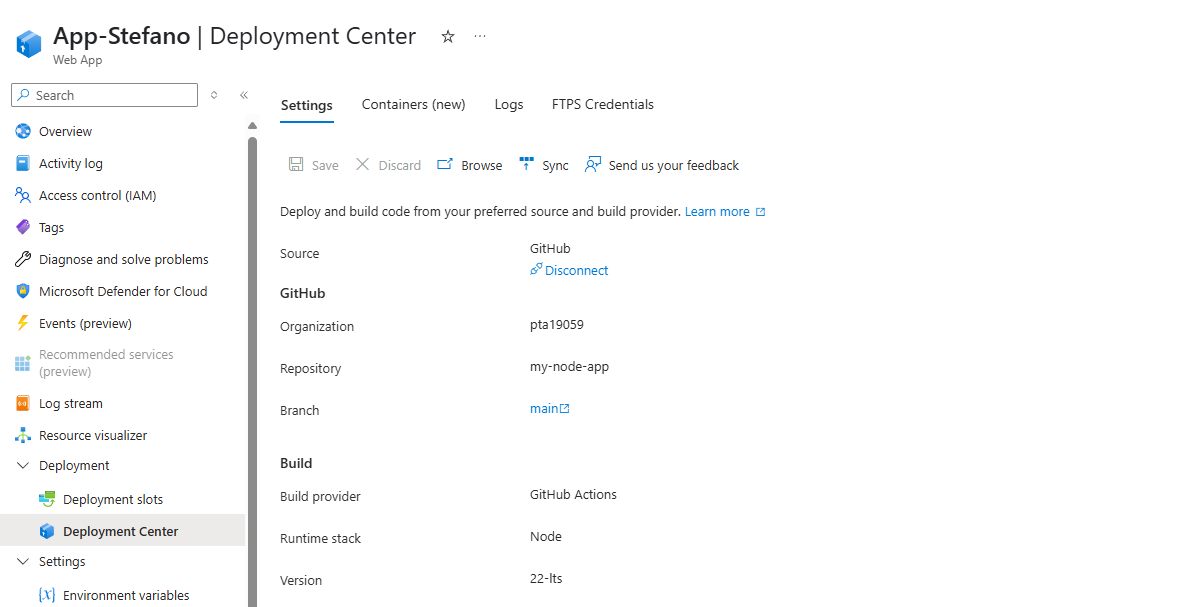
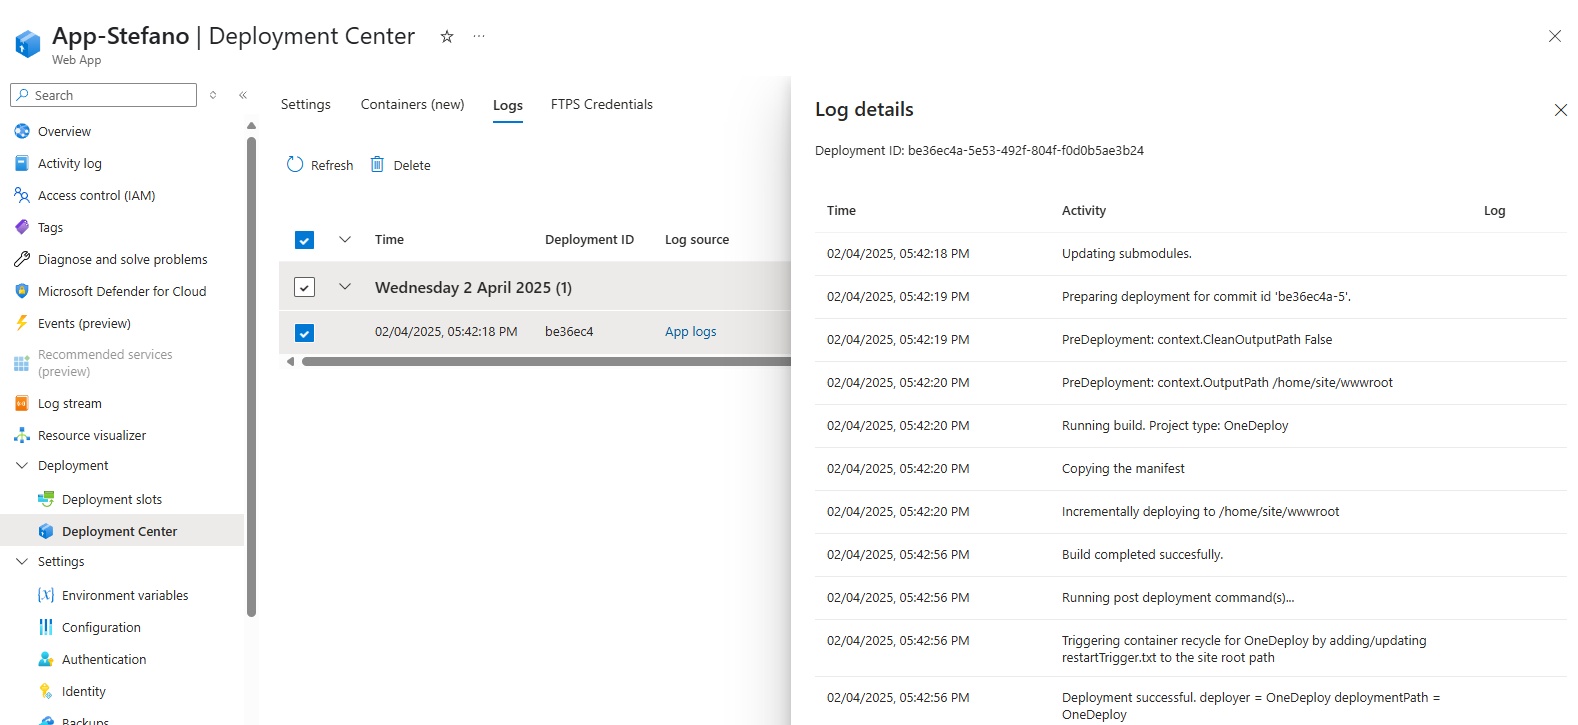
Now let’s deploy our test REST API. In order to do that, let’s click under Deployment –> Deployment Center.
For this lab, I used my personal GitHub Account and I connected it directly to my Web App for CI/CD.
if you have a personal Github Account, you can simply create a Repo (or Clone it) with the code provided and connect your GitHub Account to your Web App.
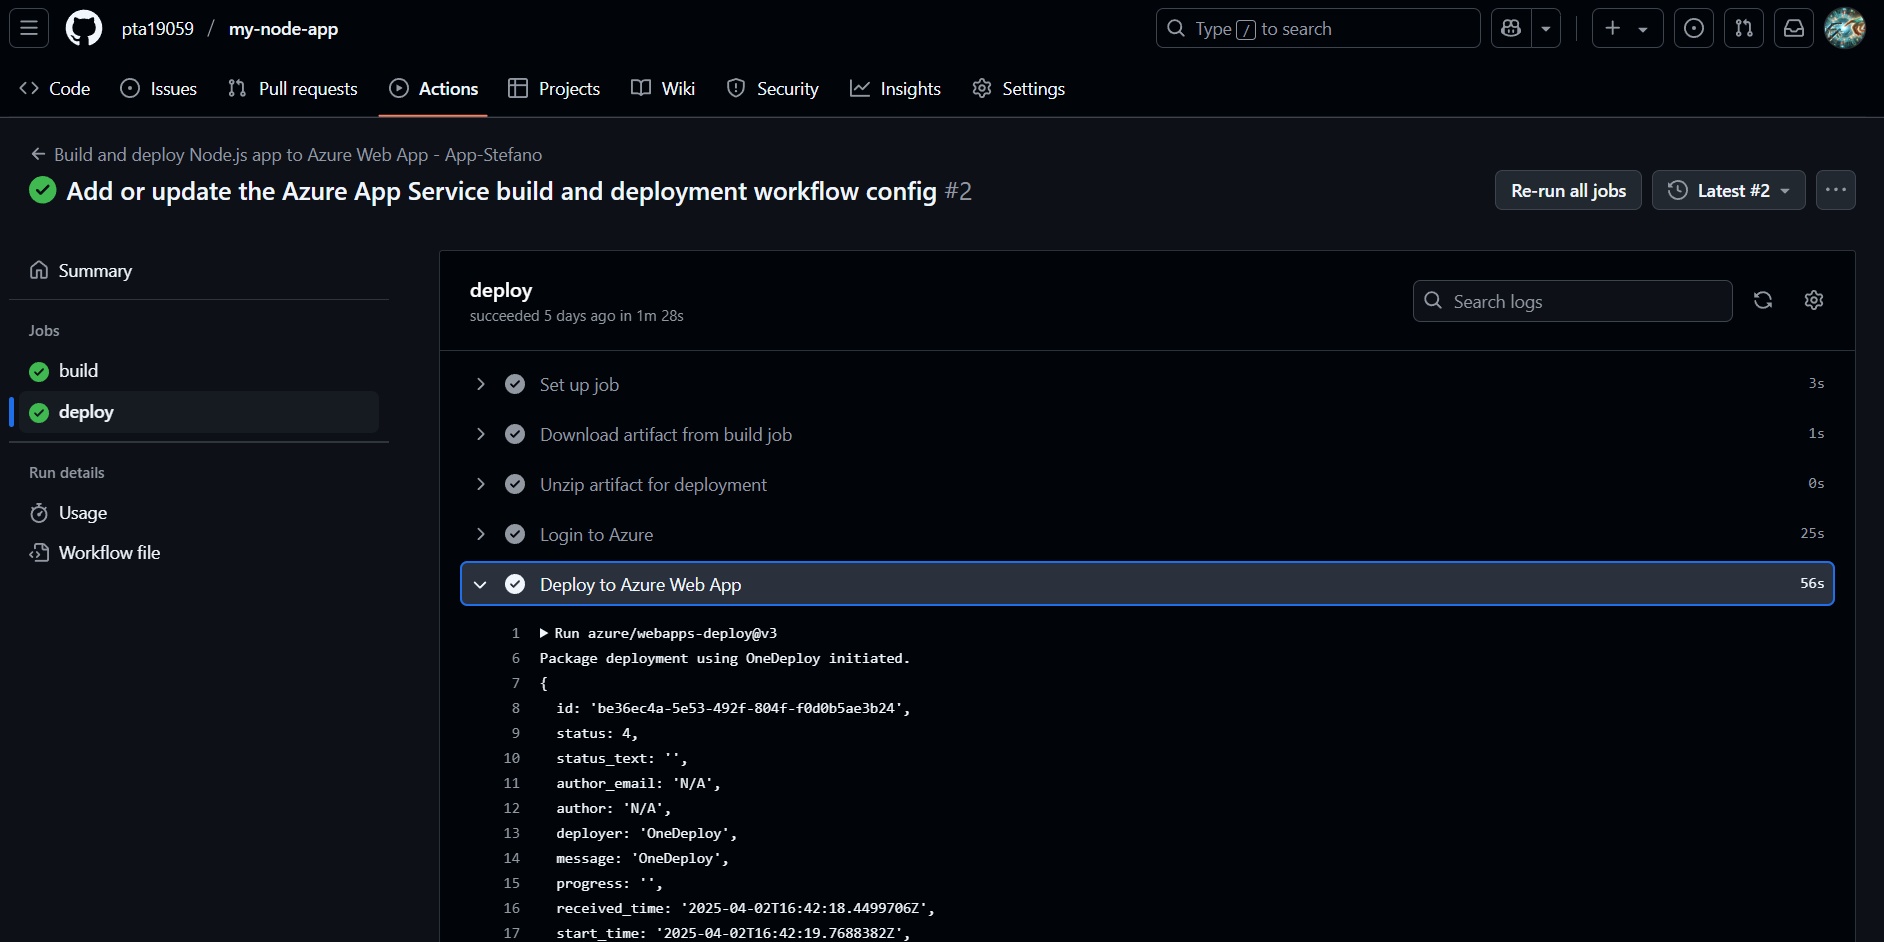
Github Actions will do the job for you.
To test your REST API, open a new page in your browser and copy your Default Domain and add /api/users/123 at the end.

If you see the output, Good Job! Now we’re ready to provision our API Management Service.
Deploy API Management Service
Best Practices APIM
This document summarizes best practices for using APIM Service.
More detailed information can be found at the following link:
Steps
-
In Azure, find in the Search bar API Management Service and click on it.
-
Click Create and let’s start to create the Service.
-
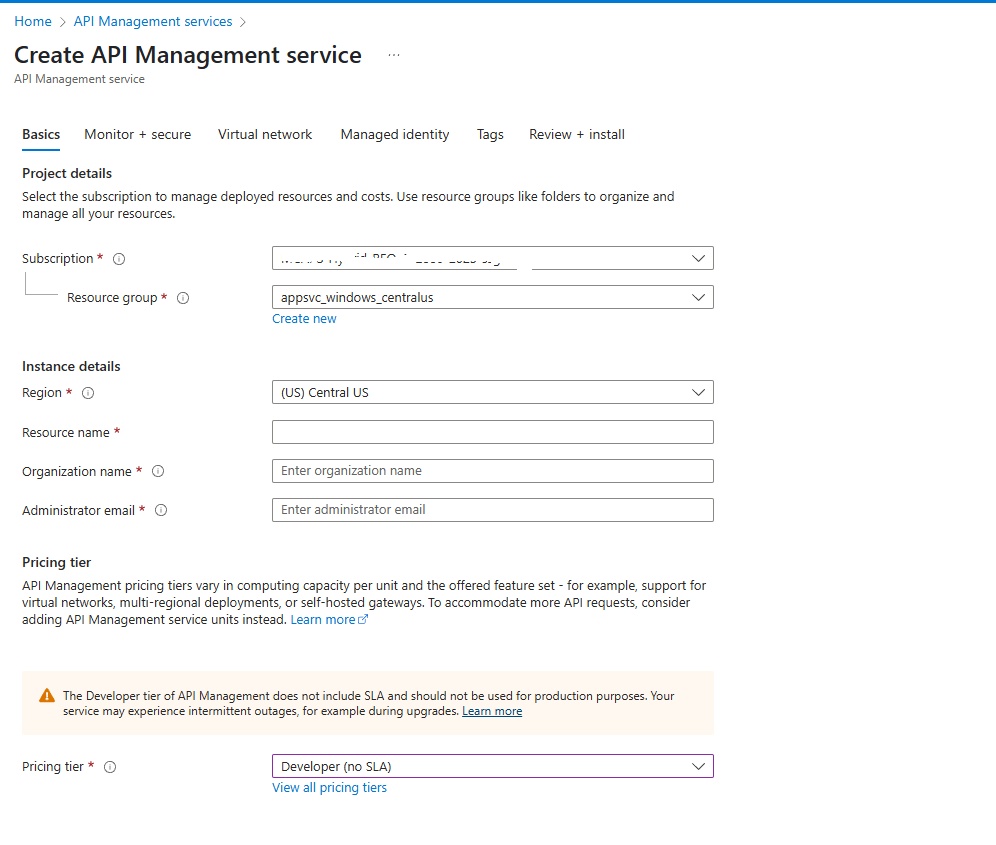
Select the Resource Group (project-integration-001), Region and provide a Resource Name.
-
For the Organization name / Administrator email, provide a name and an email (these fields are used for the Developer Portal and for email notifications).
-
Pricing Tier , for this Lab use Developer (no SLA).
Finally, click Review + create.
When deployment is completed (you have to wait a couple of minutes), you will land to the APIM main page.
We are now going to create a simple GET API (GET UserId) where when we input a userid we’ll get a response from our backend (our App Service) with the JSON tested before in our Web App.
-
Under APIs – Click APIs and then Add API . Select then HTTP Manually define an HTTP API.
-
In the Window of the creation of the HTTP API, click the tab Full.
-
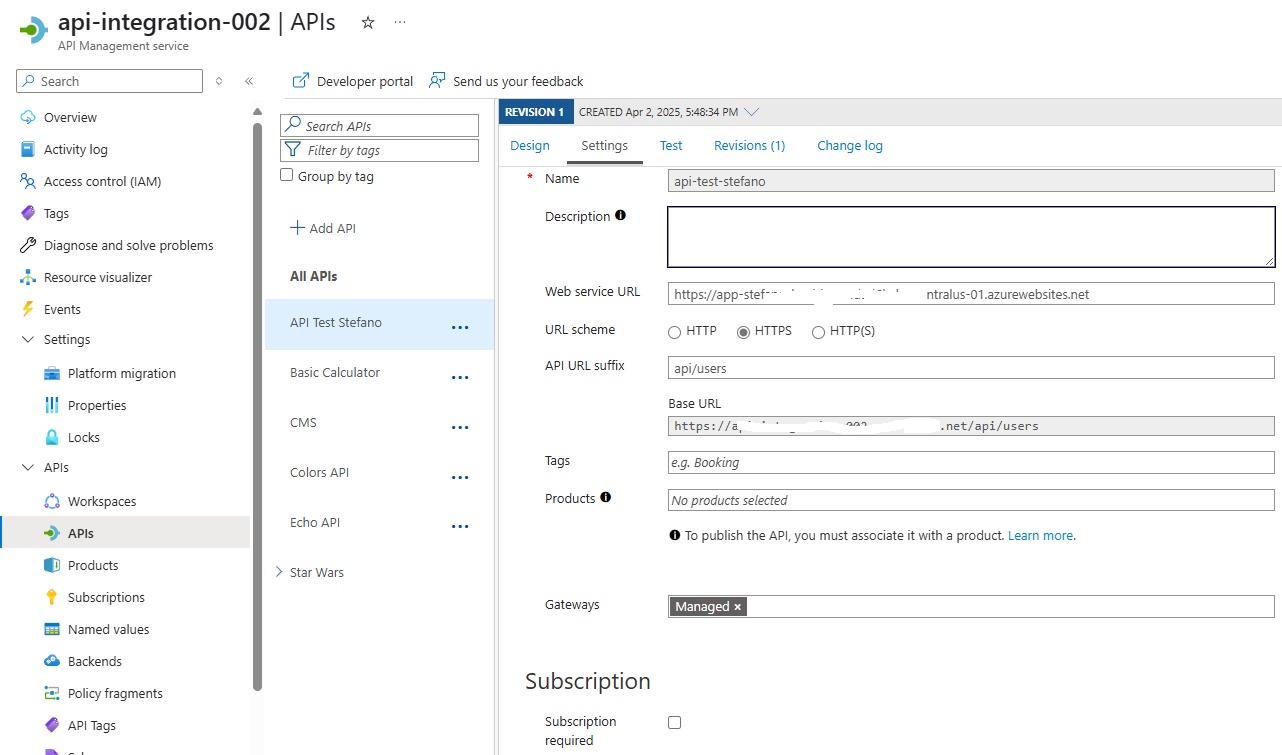
Input a Display name and in the Web Service URL use the Default domain name of your App Service deployed (https://xxxxxxxxxxxxxx.centralus-01.azurewebsites.net).
-
URL Scheme leaves HTTPS.
-
In the API URL Suffix, input api/users.
-
Leave the Default Settings and then click Create.
Once the API is deployed, in the Settings Tab deselect for now Subscription required.
-
In the Design tab, add an operation and call it GET UserId.
-
URL select GET and input /{UserId}.
-
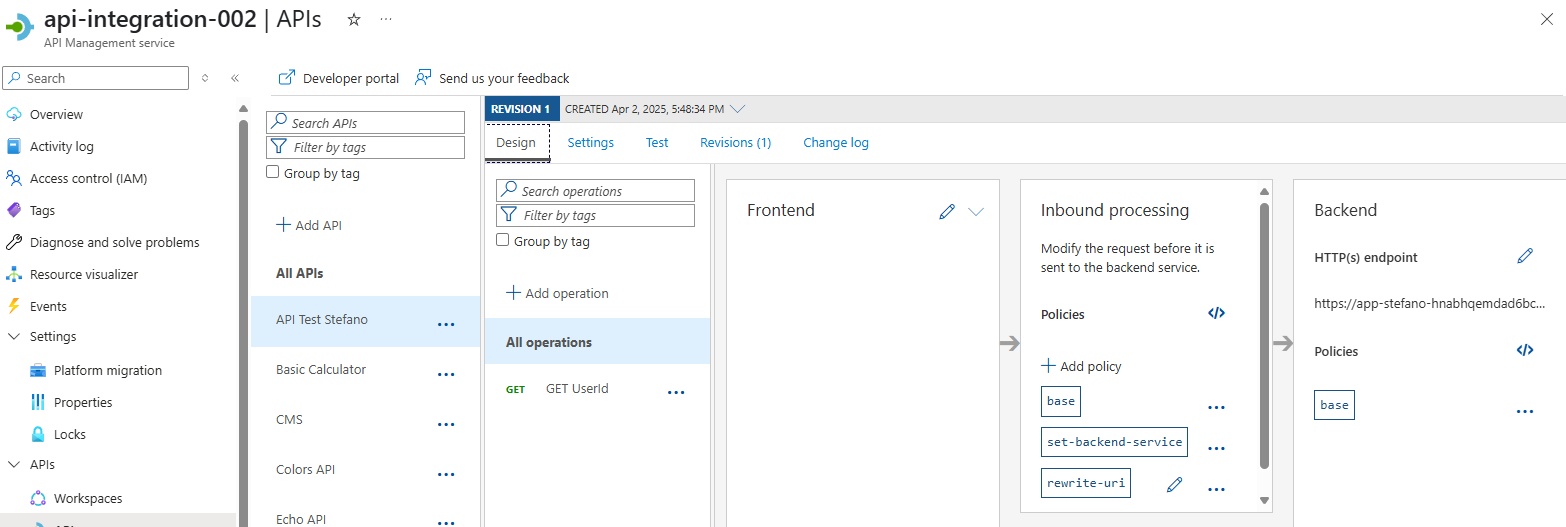
Click ALL Operations, and in the inbound processing tab add this policy (remember to replace the backend service base-url with yours Domain name of your App Service)
<policies>
    <!-- Throttle, authorize, validate, cache, or transform the requests -->
    <inbound>
        <base />
        <set-backend-service base-url="https://xxxxxxxxxxxxxxxxxxx.centralus-01.azurewebsites.net" />
        <rewrite-uri template="/api/users/{userId}" />
    </inbound>
    <!-- Control if and how the requests are forwarded to services  -->
    <backend>
        <base />
    </backend>
    <!-- Customize the responses -->
    <outbound>
        <base />
    </outbound>
    <!-- Handle exceptions and customize error responses  -->
    <on-error>
        <base />
    </on-error>
</policies>
Click Save.
In the Backend, Select HTTP(s) endpoint select Override option and add your Service URL that will be your domain name of your App Service.
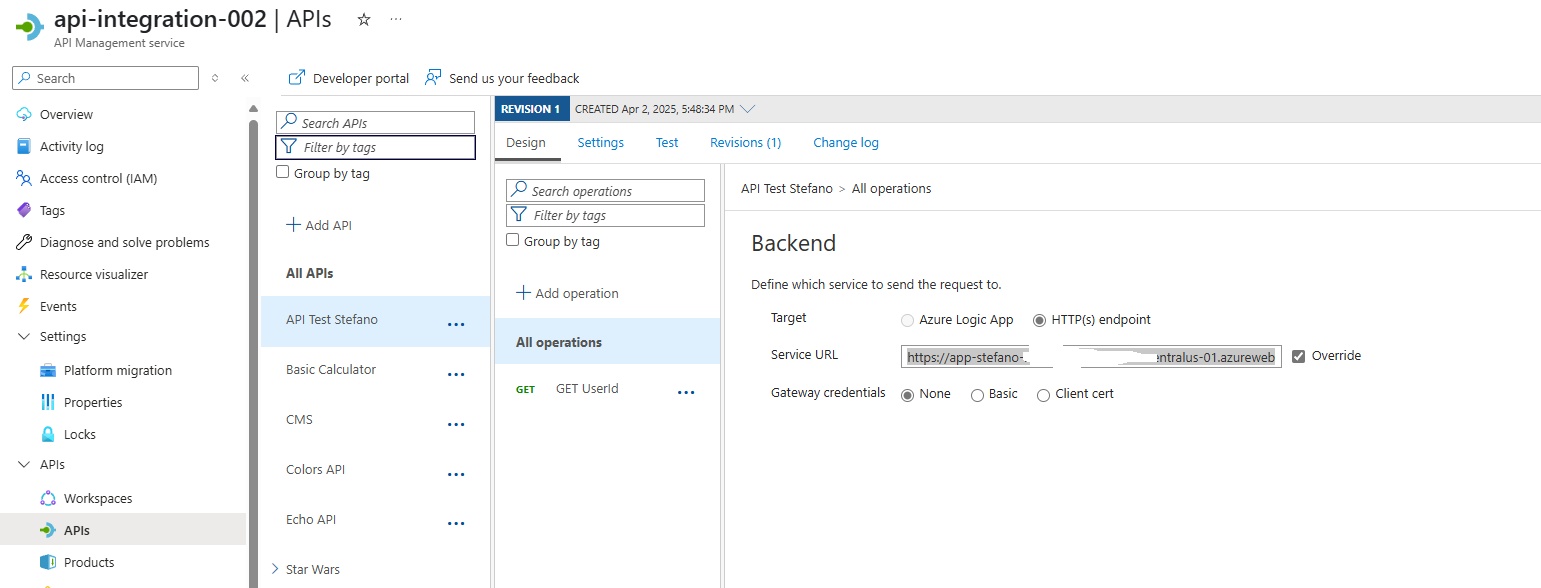
At the end, all settings should looks like as per image below:
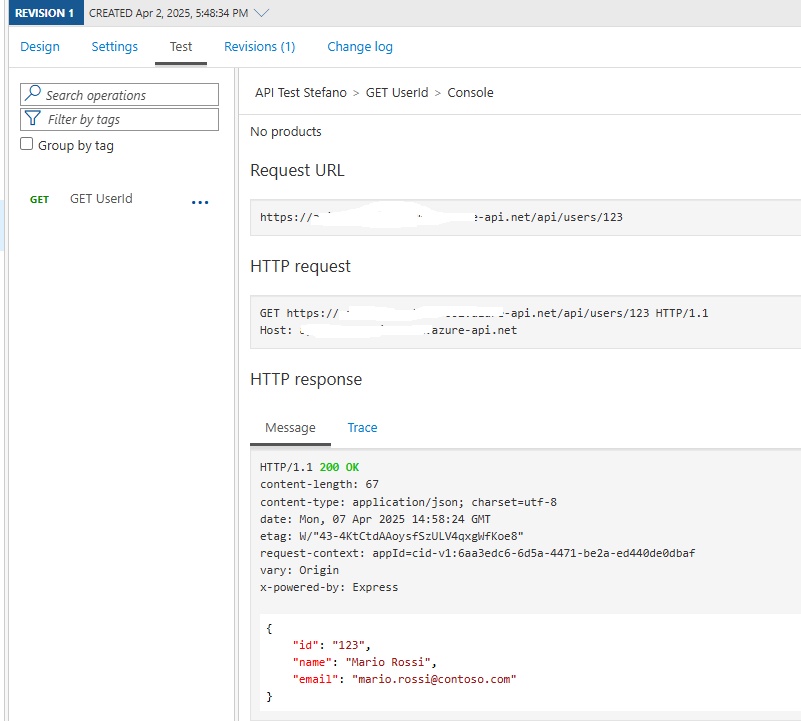
Now we need to test our API in APIM.
- Click on Test Tab , and input in UserId 123.
When you click Send you should receive 200 OK with the JSON message.
Good Job! Now we have set up API Management Service and App Service. Let’s now as a final step to deploy Azure Front Door in front of APIM.
Deploy Azure Front Door
We’re going to deploy Azure Front Door, but for the scope of this lab we’ll deploy it using basic configurations. We’ll also explain how to implement some common best practices to secure the service.
Best Practices Azure Front Door
This document summarizes best practices for using Azure Front Door. More detailed information can be found at the following link:
Key Recommendations:
- Enable HTTPS and use custom domain names.
- Use Web Application Firewall (WAF) policies to protect your endpoints.
- Implement caching strategies effectively.
- Monitor your service health and usage regularly.
- Ensure secure backend communications.
- Regularly review and update security policies.
Steps
-
In your search bar, find out “Front Doors” and when you find it click on Create to start the provisioning.
-
For this Lab, let’s keep the default Settings and click Continue to create a Front Door.
-
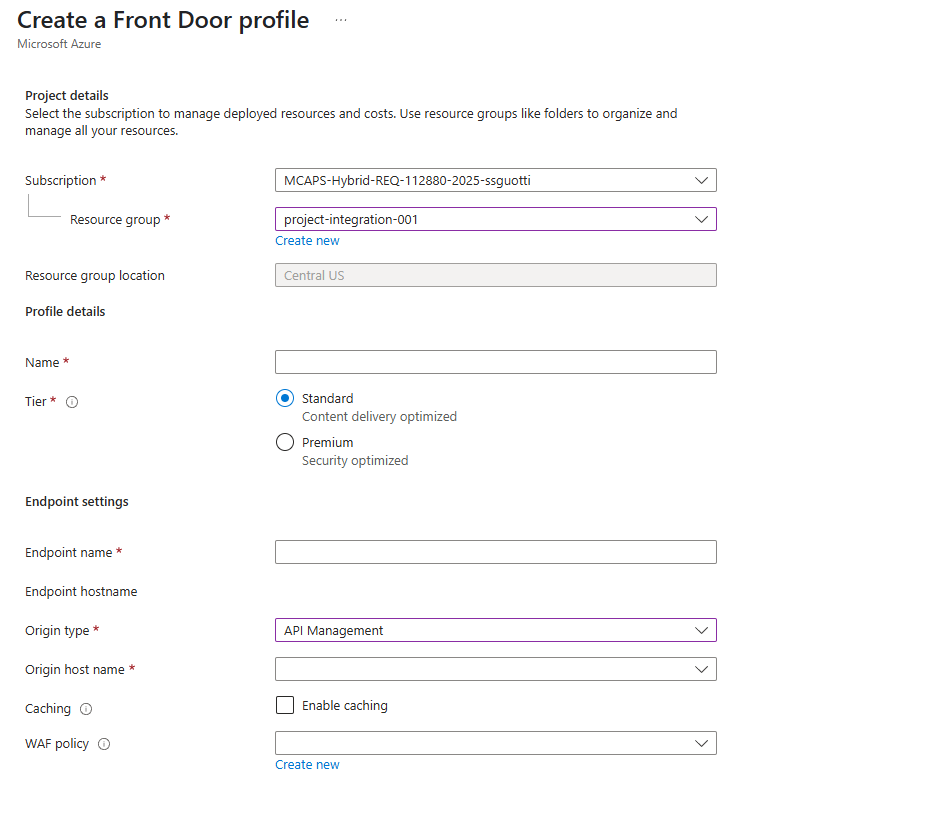
Select Resource Group (project-integration-001).
-
Provide a name for your Front Door Service.
-
Tier, select Standard for this Lab.
-
Endpoint name - Provide a name (apim-gateway, etc.). it will be generated the Endpoint hostname automatically.
-
Origin Type, select API Management.
-
Origin host name, select your APIM service from the list.
Click Review + create.
In the main page, once the deployment is completed take note about of the Endpoint hostname. We will use later to complete our lab.
Click on the Origin groups tab on your left, verify in the Origin host name there is your APIM Service and in the Health Probes complete all the fields as per image below:
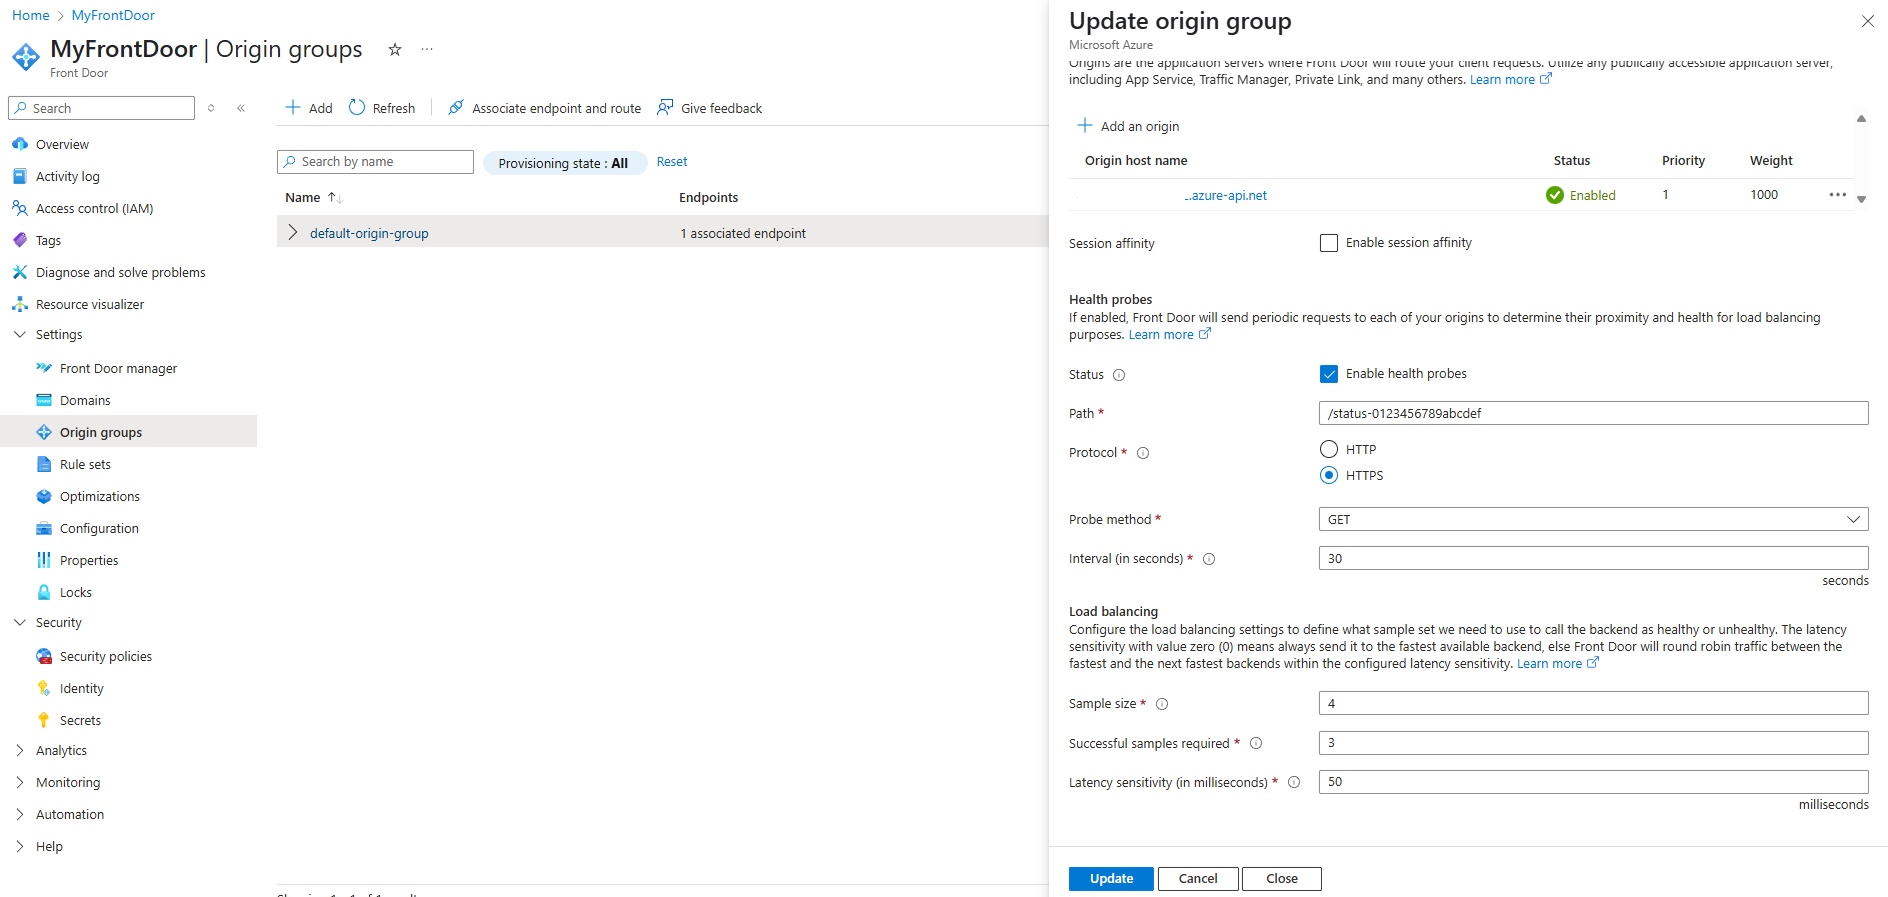
Then, click Update.
Open a new browser, copy/paste your Front Door endpoint hostname adding api/users/123 at the end (it should be https://xxxxxxxxxxxxxx.b01.azurefd.net/api/users/123) and if you see the JSON good job you have completed this Lab testing out Azure Front Door, APIM and App Service.
Well Done!

developed by Stefano Sguotti - App Innovation Specialist WE